Converged Infrastructure hacking
I just wrapped up my presentation at the Gluster Workshop at CERN where I discussed Open Source advantages in tackling converged infrastructure challenges. Here is my slidedeck. Just a quick heads up, there’s some animation that’s lost in the pdf export as well as color commentary during almost every slide.
During the presentation I demo’d out the new QEMU/GlusterFS native integration leveraging libgfapi. For those wondering what that means: there’s no need for FUSE anymore and QEMU leverages GlusterFS natively on the back end. Awesome.
For my demo I needed two boxes running QEMU/KVM/GlusterFS to provide the compute and storage hypervisor layers. As I only had a single laptop to tour Europe with, I needed a nested KVM environment.
If you’ve got enough hardware feel free to skip the Enable Nested Virtualization section and jump ahead to Base OS Installation.
This wasn’t an easy environment to get up and running. This is alpha code, so expect to roll your sleeves up. These instructions assume you have Fedora 18 installed and updated with virt-manager and KVM installed.
Enable Nested Virtualization
Since we’re going to install an OS on a VM running on the Gluster/QEMU cluster we’re building, we’ll need nested virtualization. Check if it’s already enabled:
cat /sys/module/kvm_intel/parameters/nested
If it returns N, load the KVM module with the nested option via modprobe config:
echo "options kvm-intel nested=1" | sudo tee /etc/modprobe.d/kvm-intel.conf
Reboot and verify:
cat /sys/module/kvm_intel/parameters/nested
Should return Y. Host prep is done.
Install VMs OS
Starting with the base Fedora laptop, I used virt-manager for VM management. I wanted to use Boxes, but it’s not designed for this type of configuration.
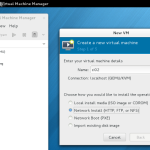
Create a new VM and select the Fedora HTTP install option. I didn’t have an ISO around, and HTTP install is great anyway.
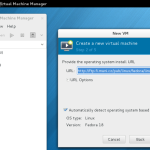
Select the HTTP install option and enter the nearest available mirror.

For me this was Masaryk University, Brno (where I happened to be sitting during Dev Days 2013):
http://ftp.fi.muni.cz/pub/linux/fedora/linux/releases/18/Fedora/x86_64/os/
I went with an 8GB base disk, 1GB RAM, and a default vCPU. Start the VM build and install.
The install takes a bit longer since it downloads files during the initial boot.
Select your language and continue to the installation summary screen. Change the software selection option.
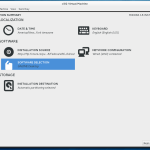
Select minimal install:
During installation, set the root password:

Once installation is complete, the VM will reboot. Power it down. We need to pass the CPU flags to the VM before proceeding.
In virt-manager, right-click the VM and select open. In the VM window, select View > Details. Rather than guessing the CPU architecture, select “Copy from host” and click OK.
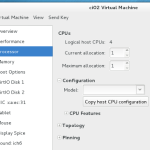
While you’re here, add an additional 20GB virtual drive. Make sure you select virtio for the drive type.

Boot the VM and let’s get started.
Base Installation Components
Install some base components before getting started with GlusterFS or QEMU. After logging in as root:
yum update
yum install nettools wget xfsprogs binutils
Create the mount point and format the additional drive:
mkdir -p /export/brick1
mkfs.xfs -i size=512 /dev/vdb
Add it to fstab so it persists across reboots:
/dev/vdb /export/brick1 xfs defaults 1 2
Mount it:
mount -a && mount
Firewalls. YMMV
It may be just me, but I struggled getting Gluster to work with firewalld on Fedora 18. Not recommended in production, but for an all-in VM on a laptop deployment, I just disabled and removed it:
yum remove firewalld
Gluster 3.4.0 Alpha Installation
Configure and enable the Gluster repo on the VM:
wget http://download.gluster.org/pub/gluster/glusterfs/qa-releases/3.4.0alpha/Fedora/glusterfs-alpha-fedora.repo
mv glusterfs-alpha-fedora.repo /etc/yum.repos.d/
Update and install:
yum update
yum install glusterfs-server glusterfs-devel
The glusterfs-devel package is required for the QEMU integration we’ll be testing.
Break: Build a Second VM
If you’ve made it here, get a coffee and do the install again on a second VM. You’ll need a second replication target before proceeding.
</end coffee break>
Network Prep: Both VMs
We’re on the private NAT’d network that virt-manager is managing, so we’ll need static addresses on both VMs and updated /etc/hosts entries. Not proud here – this is a test environment.
- Assign static addresses to both VMs in the NAT range
- Set hostnames on both VMs
- Update
/etc/hostson both nodes to include both servers
Back to Gluster
Start and verify the Gluster service on both VMs:
service glusterd start
service glusterd status
On either host, create the Gluster volume and configure it for replication:
gluster volume create vmstor replica 2 ci01.local:/export/brick1 ci02.local:/export/brick1
Start the volume:
gluster volume start vmstor
Verify:
gluster volume info
If this returns cleanly, you’re up and running with GlusterFS.
Building QEMU Dependencies
Install prerequisites:
yum install lvm2-devel git gcc-c++ make glib2-devel pixman-devel
Clone QEMU:
git clone git://git.qemu-project.org/qemu.git
Configure the build. I trimmed the target list to save time since I knew I wouldn’t need most QEMU-supported architectures:
./configure --enable-glusterfs --target-list=i386-softmmu,x86_64-softmmu,x86_64-linux-user,i386-linux-user
With that done, everything on this host is ready. We can start building VMs using GlusterFS natively, bypassing FUSE and leveraging thin provisioning.
Creating Virtual Disks on GlusterFS
qemu-img create gluster://ci01:0/vmstor/test01?transport=socket 5G
This uses qemu-img to create a 5GB disk image natively on GlusterFS. The transport socket parameter controls the communication method between QEMU and GlusterFS.
Build a VM and Install onto the GlusterFS Disk Image
You’ll want something to actually install on the image. I went with TinyCore because I was already pushing up against the limits of this laptop with nested virtualization. Download TinyCore Linux here.
qemu-system-x86_64 --enable-kvm -m 1024 -smp 4 \
  -drive file=gluster://ci01/vmstor/test01,if=virtio \
  -vnc 192.168.122.209:1 \
  --cdrom /home/theron/CorePlus-current.iso
I skipped using Virsh for the demo and assigned the VNC IP and port manually. Once the VM starts up you can connect to it from your external host and start the install.
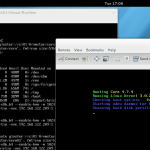
Select the hard drive built with qemu-img and follow the OS install procedure.
Finished
At this point you’re done and can start testing and submitting bugs. I’d expect to see some interesting things with OpenStack in this space as well as tighter oVirt integration moving forward. Let me know if this guide was useful.
Side Note
Something completely related: I’m pleased to announce that I’ve joined the Open Source and Standards team at Red Hat, working to promote and assist in making upstream projects wildly successful. If you’re unsure what that means or why Red Hat cares about upstream projects, please reach out and say hello.